Recently 5 articles
Most viewed 5 articles
Most popular 5 articles
Frequently Asked Questions
-
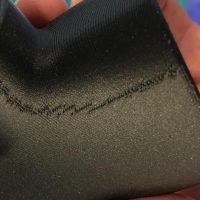
I have a seam on round components
Round components often have a seam, as shown in the following image.

This seam occurs due to the nozzle's layer change. For square components, this seam is placed on a corner by the software, so it's usually not noticeable there. However, this seam is normal for production reasons.
If the print bed is not leveled correctly, the seam may be much more pronounced. In this case, it helps to check the print bed leveling.
-
I have gaps and defects on my component
If your component has holes and defects on the surface or walls caused by too little material being extruded, this is called underextrusion.

In this case, please check the following points:
- How long has the filament been in use, and when was it last changed? If the filament is damp, please replace it.
- Is the filament free to unwind from the spool and unwinding from the top of the spool? Is there no filament tangled in the drybox?
- Does the Drybox adapter show no signs of wear, such as a slotted hole? If there is a slotted hole, you can rotate the adapter slightly so that the filament feeds through normally again, and you should replace the adapter.
- When was the loading hose (drybox > conveyor) last replaced? Does it show signs of wear, or is it under excessive tension or severely twisted?
- When was the conveyor hose (conveyor > print head) last replaced? Does it show signs of wear?
- When was the nozzle last changed?
Optionally, you can also run the Underextrusion Utility on your printer: Menu > Utilities > Maintenance > Underextrusion Troubleshooting
-
Can I glue components?
Onyx and nylon components can be bonded. For joining, we recommend:
- Loctite 401 for rigid connections
- Loctite 4861 for flexible connections
- Petec Poxy 2K Adhesive
- Formic acid in a 75% concentration: The acid slightly dissolves the surface and serves both as a welding process and as a smoothing agent. Appropriate protective equipment should be worn here!
- Welding: There is a blog entry about this from our English colleagues: https://www.mark3d.com/en/2126-2-2/
-
I have threads on the component, what can I do about it?

If you have threads on your component, this is usually due to damp material. If you have such threads on your component, please follow the steps below:
- Print a purge line (Menu > Utilities > Test Prints > Wet Plastic Purge). If you see a lot of steam during printing, your material is most likely damp. Then please follow the next steps.
- Pause a print and observe the nozzle. There should be NO material coming out. If material is coming out, your material is most likely wet.
- Replace your material with fresh, dry material. The threads on the components should now be gone.
-
I have gaps and defects on my component
If your component has holes and defects on the surface or walls caused by too little material being extruded, this is called underextrusion.
In this case, please check the following points:
- How long has the filament been in use, and when was it last changed? If the filament is damp, please replace it.
- Is the filament free to unwind from the spool and unwinding from the top of the spool? Is there no filament tangled in the drybox?
- Does the Drybox adapter show no signs of wear, such as a slotted hole? If there is a slotted hole, you can rotate the adapter slightly so that the filament feeds through normally again, and you should replace the adapter.
- When was the loading hose (drybox > conveyor) last replaced? Does it show signs of wear, or is it under excessive tension or severely twisted?
- When was the conveyor hose (conveyor > print head) last replaced? Does it show signs of wear?
- When was the nozzle last changed?
Optionally, you can also run the Underextrusion Utility on your printer: Menu > Utilities > Maintenance > Underextrusion Troubleshooting
-
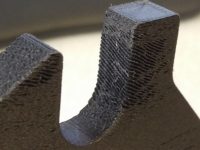
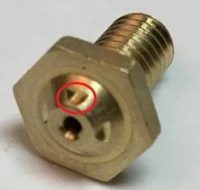
How do I know if my nozzles are worn out?
A worn plastic nozzle can be identified by the print results. If defects similar to those in the following image appear on the walls, the plastic nozzle should be replaced.
The fiber nozzle has four wear indicators on the tip. When the wear reaches the notches on the tip, the fiber nozzle should be replaced.

The plastic and fiber nozzles should be replaced every 1000 printing hours to prevent printing complications.
-
Internet connection “Seeking Eiger”
If you have connected your printer to the Internet and a yellow exclamation mark is displayed next to the connection icon, or if “Seeking Eiger” is displayed in the connection prompt in the Network Manager (Menu > Settings > Network Manager > “Offline”), this may be due to the following reasons:
- Firewall: Please have your IT department check the following ports. Communication on one of the ports is blocked, preventing the printer from connecting to the cloud.
Hostname port Protocol Needed Task s3.amazonaws.com 443 TCP Yes Printer operation mfeigerproduction.s3.amazonaws.com 443 TCP Yes Printer operation cdn.eiger.io 443 TCP Yes Printer operation www.eiger.io 443 TCP Yes Printer operation *.pool.ntp.org 123 UDP Yes Network Time Protocol ipv4.connam.net 80 TCP no Online status check data.logentries.com 443 TCP no Remote logging data.logentries.com 10000 TCP no Remote logging before Sept. '18
- Firewall: Please have your IT department check the following ports. Communication on one of the ports is blocked, preventing the printer from connecting to the cloud.
-
My printer is printing inaccurately, what should I do?
Tolerance variations and inaccuracies can depend on several factors, including part geometry, belt tension, print bed leveling, and bearing/linear guide condition.
If your printer does not print components accurately, please follow the steps below:
– Leveling the build platform and then printing the bed level test print for verification
– Check the belt tension
– Check the bearings for damage and replace them if necessary
– Check the linear guide and relubricate if necessary -
When do I need to set the z-offset?
The z-offset is important for the printer to know where the lowest and highest positions of the bed are. It should be set during initial setup and whenever a new print bed is used.
-
What should be considered when leveling the bed?
- The nozzle must be clean.
- First, start by setting the z-offset if you haven't already done so on your current print bed. This tells the printer where the top and bottom positions of the bed are.
- The feeler gauge on the plastic nozzle (labeled PLASTIC) should make a slight scratching noise when moved back and forth. It must be a bit tighter than usual.
- The feeler gauge of the fiber nozzle (labeled FIBER) should have very little resistance. Therefore, it's better to set the fiber nozzle too far away from the print bed than too close.
- Check the bed adjustment with the Bed Level Test Print
- Check the fiber nozzle setting with the staircase.
-
How do I clean the nozzle?
- Manually heating the nozzle
Utilities > Manual Control > Temperature Control > Heat > Plastic - Wait until the temperature reaches 275 °C.
- Switching off the nozzles
Utilities > Manual Control > Temperature Control > Cool > Plastic - Remove the dirt with the brass brush until a temperature below 200 °C is reached.
- Manually heating the nozzle
-
When does a dislocation error occur?
A dislocation error is generated by the printer when it detects that the print head is no longer positioned correctly during the reference run (on the desktop series, every 5 layers in the back right corner). In this case, the printer aborts the print to avoid wasting more material.
The following causes can cause a dislocation error:
- Incorrectly leveled print bed
Remedy by re-leveling the print bed and then running the bed level test print. - Too little or wrong glue used
Remedy by using enough glue, which is recommended by Markforged (Elmer's glue, purple) - Worn bearings
Check for any clicking noises coming from the idler rollers as the print head moves. Are there any black dust spots on the idler rollers? - Underextrusion: Please print the purge line once (Menu>Utlities>Test Prints>Wet Plastic Purge) and send us a picture of it.
- Incorrectly leveled print bed
-
I have problems with the temperature, what should I do?
If the display shows a temperature of over 300 degrees, the electrical connection of the temperature sensor is faulty.
If the print head can no longer build up the temperature correctly, the following must be checked:
- Flex cable installed correctly.
It often helps to detach and reattach the flex cable from the print head. Then clear the errors. - Flex cable damaged.
Sometimes the flex cable may be damaged. If you notice a kink or a mark in the flex cable, it may need to be replaced. Please contact Mark3D support for assistance. - Onyx discontinued
To check this, loosen the two screws securing the white print head cover and fold the cover back. If you see Onyx behind it, the print head is defective and needs to be replaced. Please contact Mark3D support for assistance. - Motherboard defective
In rare cases, the motherboard may also be causing the problem. This can usually only be determined by replacing it.
- Flex cable installed correctly.
-
What should I do if no more material comes out of the nozzle?
In most cases, this is due to a clogged nozzle. To resolve this, follow these steps:
- Manually heating the nozzle
You can do this via Utilities > Manual Control > Temperature Control > Heat > Plastic. - Removing the guide tube from the print head
To do this, loosen the knurled screw on the plastic tube on the print head. - Removing the nozzle
You can remove the nozzle using the supplied torque wrench - Checking the guide path on the print head
If you now look from above into the plastic guide channel on the print head, you should be able to see all the way to the bottom of the printer. - Cleaning the blockage
Use a long, thin rod or a thin Allen key to go through the guide channel and remove all remaining material from the guide channel. - Changing the nozzle
Now screw in a new nozzle. To do this, use the program Utilities > Maintenance > Replace Plastic Nozzle and follow the instructions. Remember to apply graphite paste to the thread of the new nozzle. - Mounting the guide hose
Reinstall the guide tube and tighten the knurled screw. - Print the PurgeLine for control
If you now print the PurgeLine under Utilities > Test Prints > Wet Plastic Purge Print, the material should flow as usual again.
- Manually heating the nozzle
-
How do I recognize bearing damage?
Identify the defective bearings
To determine which bearing is defective, move the print head back and forth. If the rattling occurs only in the x-direction and not in the y-direction, it is the rear right bearing. If the rattling occurs only in the y-direction and not in the x-direction, it is a bearing under the crosshead. If it occurs in both the x and y-direction, it is the front left bearing. In rare cases, multiple bearings are affected.
-
What should I do if the components show signs of underextrusion?
General information on sub-extrusion
There are two types of underextrusion:
- Underextrusion occurs without conveyor cracking.
This case is very rare and indicates that the conveyor most likely needs to be replaced. - The conveyor cracks when creating the component
The conveyor always cracks when it reaches the torque limit. As soon as this happens, the motor retracts the material a few millimeters and then feeds again. This prevents the material from being worn down by continuous feeding. A cracking noise from the conveyor always indicates that the conveyor itself is working properly and the source of the problem lies elsewhere. The cause is usually excessive resistance when conveying the material, which can be caused by the following:- Resistance in the guide hose (hose from the conveyor to the print head)
This is a very common cause. Due to the abrasive nature of Onyx, the conveyor hose wears down over time. This leads to increased friction and thus increased friction within the hose. Replacing the hose can help. The hose is part of the all-round carefree package. If your printer has one, you'll receive one free of charge. - Resistance due to worn nozzle
A worn nozzle is also often responsible for under-extrusion. We recommend changing the nozzle every 6-8 rolls of Onyx (or 1000 printing hours). (You can find the number of printing hours in the menu under Settings > System Info > Trophy Icon.) The nozzle is not included in the all-inclusive package and must be purchased separately. - Resistance due to hooked coil in the drybox
Sometimes the spool in the drybox won't move freely and gets stuck. Often, removing and reinserting the spool helps. - Resistance due to a kink in the charging hose
If the loading hose has a kink or tight radii, the resistance in the loading hose increases. To test whether the problem is with the loading hose, you can disconnect it from the conveyor and remove it from the printer. Then unwind the material by hand and let it feed into the conveyor without resistance. Now let the printer print a new job and see if the underextrusion disappears. It is important to run a new print job here, as underextrusion (and thus unclean printing) in the lower layers ensures that the upper layers are not printed cleanly and is very likely to lead to underextrusion. - Incorrect or unleveled print bed
If the print bed has not been correctly leveled using bed leveling, there is a risk that the distance between the print bed and the nozzle will be either too large or too small. This can result in print bed damage due to the nozzle scraping on the build platform if the distance is too small, or in non-adherent components if the distance is too large. - Blockage in the print head
Cleaning the print head
- Resistance in the guide hose (hose from the conveyor to the print head)
We'd be happy to help you quickly determine the cause of the underextrusion. Simply contact our support team at support@mark3d.de.
- Underextrusion occurs without conveyor cracking.
-
What is the difference between the X-Series and the Desktop Series?
The X-Series offers the following advantages
other belt drive
While the Desktop series uses two belts, the X-Series has only one belt, guided in an H-shape. The H-shape allows the drive encoders to be calibrated, resulting in greater accuracy.
Desktop drive:

X-drive:

finer resolution
The Desktop series achieves a layer resolution of 0.1 mm, while the X-series achieves a resolution of 0.05 mm. This gives the components a finer, smoother surface.
integrated laser
The integrated laser in the X-Series enables perfect alignment of the print bed regardless of operator influence.
automatic adjustment of the print bed
Before each print, the print bed leveling is checked. Calibration lines are used to automatically adjust the nozzle distance to the print bed.
larger installation space
Desktop Series (W x D x H): 320mm x 132mm x 154mm
This makes a volume of 6.5 litersX-Series (W x D x H): 330 mm x 270 mm x 200 mm
This makes a volume of 17.8 liters (factor 2.7) -
Why does the conveyor click?
The conveyor always cracks when it reaches its torque limit. As soon as this happens, the motor pulls the material back a few millimeters and then feeds again. This prevents the material from being worn down by continuous feeding. A cracking noise from the conveyor always indicates that the conveyor itself is functioning properly and the problem lies elsewhere. The cause is usually excessive resistance when conveying the material.


-
Can I dry damp material?
Wet material should always be replaced with fresh material. However, the material can also be dried. The wet filament can be dried for 3-12 hours at 80°-110°C, depending on the amount of remaining material on the spool. To do this, simply place the entire spool (without the drybox spool holder) in a suitable drying oven (or filament dryer). The silica gel packets in the drybox should also be dried while the material is drying, but they should not be heated above 80°C.
However, fresh filament is always preferable to dried filament. While the material can be dried, and this is usually a working method, we cannot guarantee its performance. The best way to keep material dry is to use a second drybox for storage.
-
What is the nylon material?
The nylon material is PA6. Unlike Onyx, it has no fiber content and therefore offers slightly higher stretchability.
-
What is the onyx material?
The Onyx material is PA6 with an integrated carbon microfiber content of 12-15%. The carbon content ensures greater strength, but also better printability of the material.
-
My printer is connected to the Internet but not online in the software
If you have connected your printer to the Internet but it is not displayed as online in your Eiger software, this may be due to the following reasons:
- The printer was not recognized by the Eiger: Take the printer offline (Menu > Settings > Network Manager > “Offline”) and reconnect it to the Internet.
- Firewall: Please have your IT department check the following ports:
Hostname port Protocol Needed Task s3.amazonaws.com 443 TCP Yes Printer operation mfeigerproduction.s3.amazonaws.com 443 TCP Yes Printer operation cdn.eiger.io 443 TCP Yes Printer operation www.eiger.io 443 TCP Yes Printer operation *.pool.ntp.org 123 UDP Yes Network Time Protocol ipv4.connam.net 80 TCP no Online status check data.logentries.com 443 TCP no Remote logging data.logentries.com 10000 TCP no Remote logging before Sept. '18
-
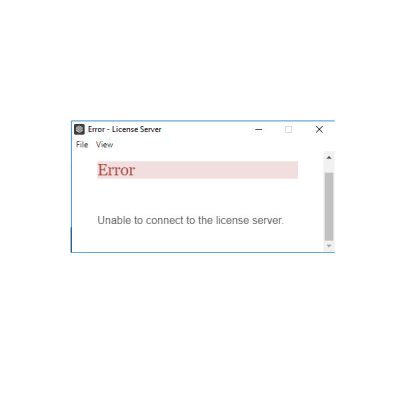
The desktop version does not start

If you receive the above error message when starting the desktop version and cannot connect to the server, this may be due to the following reasons:
- No internet connection: The desktop version requires an internet connection for license synchronization and application data exchange. Make sure you are connected to the internet.
- Firewall: If you have an internet connection and the software still won't start, it's possible that the communication ports are blocked. Please have your IT department check the following ports:
Hostname port Protocol Needed Task s3.amazonaws.com 443 TCP Yes Printer operation mfeigerproduction.s3.amazonaws.com 443 TCP Yes Printer operation cdn.eiger.io 443 TCP Yes Printer operation www.eiger.io 443 TCP Yes Printer operation *.pool.ntp.org 123 UDP Yes Network Time Protocol ipv4.connam.net 80 TCP no Online status check data.logentries.com 443 TCP no Remote logging data.logentries.com 10000 TCP no Remote logging before Sept. '18
-
I don't receive any emails from Eiger, what can I do?
If you do not receive an email when registering in Eiger, this may be due to the following reasons:
- Incorrect email address during registration: Try registering with Eiger again using your email address. If you receive an error message stating that the email address is already in use, you have entered the correct email address.
- Spam Mail: Due to the domain extension eiger.io, this email may end up in your spam or junk folder. Please check your email address.
- Firewall: Due to the eiger.io domain extension, some firewalls may delay email delivery. This delay can sometimes last up to 12 hours. If no email has arrived after 12 hours, the .io domain extension may be blocked completely. Please contact your IT department to unblock the .io domain extension.
-
What software variants are available?
Markforged offers 3 different software variants:
- Cloud variant
- Desktop version
- On-premise variant
You can find information about this in our brochure.